
This month we will look at how to create a customized lookup. The customized lookup will help your Sage 500 users streamline their searching when performing lookups. The following example is in the Maintain Vendors lookup used throughout various tasks in Accounts Payable.
For example, when you are creating new vouchers. and click the Vendor lookup, it looks like this :
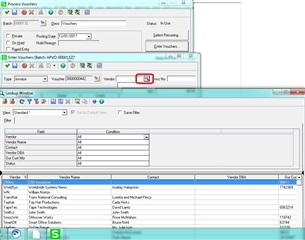
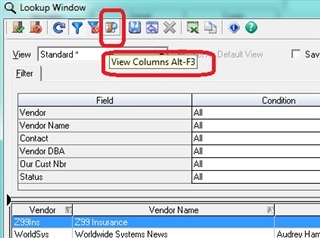
The vendor lookup returns the columns shown above. What if, when you are looking up vendors from the Enter Voucher task, you really only want to see the Vendor(vendor id) and the Vendor name from this task. You can change the list of columns that want to be returned. One way you can do this is by clicking the View Columns icon at the top of the form.
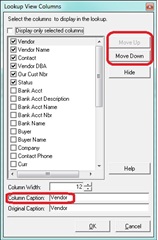
You can check to show the column or uncheck to hide the column(alternatively you can select the column and click the Hide button).
The Move Up / Move Down button allows you to change the order of the way the columns are shown.
The Column Caption allows you to change the name of the column heading. (You cannot change the name of the Original Caption).
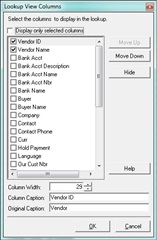
Here is what it would look like If we wanted to create a lookup that showed only the Vendor and Vendor Name. I renamed the Column of Vendor to Vendor ID. Click the Ok button to continue.
Here is what the lookup looks like now:

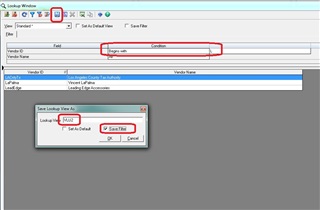
Let's make one more change and set the filter to only show Vendor ID's that start with "L", and click the Save As icon.
The Save Lookup View As dialog box pops up. Enter the name you want to use (VLU2 in this example), place a checkmark next to the Save Filter option. (If you don't, the "VendorID begins with "L" filter will not be saved nor included for this lookup we created. Click OK
Since we didn't choose to Set As Default, when we close the task and reopen, the Standard view will be used as your default. You can create many different lookup combinations and set the default to anyone desired.
One thing to note is that the Sage Standard view cannot be changed, you will receive a message informing you if you accidentally try to save any changes.
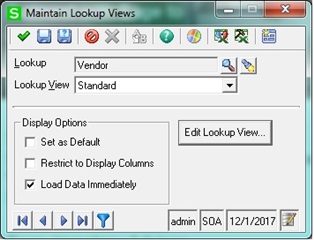
You can also create lookups from System Manager, Maintenance, Maintain Lookup Views task, though you may need rights to see that task. you want the lookups. Lookups created from here are made available to other Sage 500 users. There are a couple of additional options that can be used to Restrict to Display Columns and Load Data Immediately. Click on the Help icon for more details about those options. The process is the same to create the lookup, but you need to first to select/ find the lookup, click the Edit Lookup View button, click the View Columns icon, to bring up the list of columns. After you make your selections, click save and close out of those screens until you come back to the Maintain Lookup Views screen and click the Save As icon and provide a name for the lookup.
I recommend test creating these custom lookups in a test database first to become familiar with the process. To delete the custom lookups created, click on the red X icon at the top of the form. Once they are deleted, they are gone and cannot be recovered from Sage 500.
I hope you get a chance to try this out and if you do, let me know how it worked for you.