

Introduction
In my last posting I showed how to quickly create an empty Sage 300 Web UI by running our two new wizards from Visual Studio. In this article we’ll look at how to add some visual controls to this project and talk a bit about some of the issues with doing this, namely about using our provided HTML helper functions and CSS styling.
We’re basically going to continue on and add the visual elements for the PJC Cost Types setup screen. We won’t write any JavaScript yet, so the only functionality will be that provided by the code generator and the default data binding support. This still give quite a bit as you can navigate, use the finder, delete records and save updates.
The UI Wizard discussed last week produces a simple starting page with the standard heading controls, the key field and the Save and Delete buttons. These are all wired up to Javascript and working. This makes our life much easier when adding the rest of the controls.
The only thing you need to do manually is change the Starting Page to: “/OnPremise/PM/CostType” on the Web tab of the Web project’s properties. Then it will compile and run yielding:

Adding the Parts
ASP.Net MVC Razor Views are a technique to dynamically generate our HTML by embedding C# code in an HTML template. When the HTML needs to go to the browser the C# code is executed and it usually generates more HTML into the template, so that pure dynamically generated HTML is transmitted to the Browser. The Razor View system is very extensible and it allows a lot of extensibility which we do by adding a large set of helper functions.
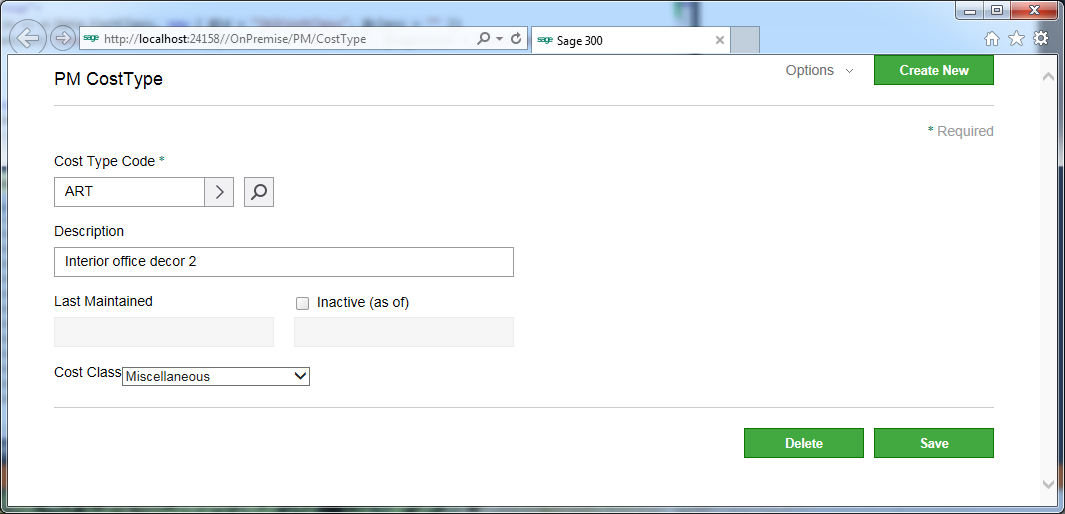
Below is the screen once we add some more controls. I showed with a record loaded since that part works with the generated code. The dates and bottom combo box aren’t working yet since we need to add some JavaScript code to help them out.
The source code for this screens Razor View (the partial view part) is:
@* Copyright © 2015 Sage *@
@model Sage.Web.Areas.PM.Models.CostTypeViewModel<Sage.PM.Models.CostType>
@using Sage.PM.Resources.Forms
@using Sage.CA.SBS.ERP.Sage300.Common.Web.AreaConstants
@using Sage.CA.SBS.ERP.Sage300.Common.Resources
@using Sage.CA.SBS.ERP.Sage300.Common.Web.HtmlHelperExtension
@using Sage.CA.SBS.ERP.Sage300.Common.Models.Enums
@using AnnotationsResx = Sage.CA.SBS.ERP.Sage300.Common.Resources.AnnotationsResx
<script type="text/javascript">
@Html.ConvertToJsVariableUsingNewtonSoft("CostTypeViewModel", Model)
</script>
@Html.Partial("~/Areas/PM/Views/CostType/Partials/_Localization.cshtml")
<div id="success"></div>
<div class="container_16">
<div id="message"></div>
<section class="header-group">
@Html.SageHeader3Label("CostTypeHeader", CostTypeResx.Entity)
@if (Model.UserAccess.SecurityType.HasFlag(SecurityType.Modify))
{
@Html.KoSageButton("btnNew", null, new { @value = CommonResx.CreateNew, @id = "btnNew", @class = "btn-primary" })
}
@Html.Partial(Core.Menu, Model.UserAccess)
</section>
<section class="required-group">
@Html.SageLabel(CommonResx.RequiredLegend, new { @class = "required" })
</section>
<div class="form-group">
<div class="search-group">
@Html.SageLabel("CostTypeCode", CostTypeResx.CostTypeCode, new { @class = "required" })
@Html.KoSageTextBoxFor(model => model.Data.CostTypeCode, new { @sagevalue = "Data.CostTypeCode",
@valueUpdate = "'input'" }, new { @id = "txtCostTypeCode", @class = "default txt-upper", @formatTextbox = "alphaNumeric" })
@Html.KoSageButton("btnLoadCostTypeCode", null, new { @id = "btnLoad", @class = "icon btn-go", @tabindex = "-1" })
@Html.KoSageButton("btnFinderCostTypeCode", null, new { @class = "icon btn-search", @id = "btnFinderCostTypeCode", @tabindex = "-1" })
@Html.ValidationMessageFor(model => model.Data.CostTypeCode)
</div>
</div>
@* End of generated header, next is code I wrote. *@
<div class="form-group">
<div class="input-group">
@Html.SageLabelFor(model => model.Data.Description)
@Html.KoSageTextBoxFor(model => model.Data.Description, new { @value = "Data.Description", @valueUpdate = "'input'" },
new { @id = "tbDescription", @class = "large" })
@Html.ValidationMessageFor(model => model.Data.Description, null)
</div>
</div>
<div class="form-group">
<div class="input-group">
@Html.SageLabelFor(model => model.Data.LastMaintained)
@Html.KoSageTextBoxFor(model => model.Data.LastMaintained, new { @value = "Data.ComputedLastMaintainedDate" },
new { @disabled = "true", @class = "default" })
</div>
<div class="input-group with-checkbox">
<div class="child">
@Html.KoSageCheckBox("chkStatus", false, new { @sagechecked = "Data.Status" }, new { @id = "chkStatus" })
@Html.SageLabel(CommonResx.InactiveAsOfDate, null, new { @for = "chkStatus", @class = "" })
</div>
@Html.KoSageTextBox("txInactiveDate", new { @value = "Data.ComputedInactiveDate" }, new { @disabled = true, @class = "default " })
</div>
</div>
<div class="form-group">
<div class="dropdown-group">
@Html.SageLabelFor(m => m.Data.CostClass, new { @id = "lblCostClass", @class = "" })
@Html.KoSageDropDownList("Data_CostClass", new { @options = "CostClass", @sagevalue = "Data.CostClass",
@optionsText = "'Text'", @optionsValue = "'Value'" }, new { @class = "w188" })
</div>
</div>
@* End of my code, next is the generated footer. *@
<section class="footer-group">
@if (Model.UserAccess.SecurityType.HasFlag(SecurityType.Modify))
{
@Html.KoSageButton("btnSave", new { }, new { @value = CommonResx.Save, @id = "btnSave", @class = "btn-primary" })
@Html.KoSageButton("btnDelete", new { }, new { @value = CommonResx.Delete, @id = "btnDelete", @class = "btn-primary" })
}
</section>
</div>
I put comments around the code I wrote so you can see what is generated by the code generation wizard versus the code you add later. Basically this is a mixture of C# code (each line starts with @) and HTML which is in the angle brackets.
There isn’t much layout in this file because this is handled by the CSS. For simple screens like this one there are sufficient styles in the provided Sage standard CSS file that we don’t need to add any CSS. As a result, the HTML is actually fairly simple and really just used to logically group things.
Notice that we use Sage provided extension functions to create all the controls. This provides us with the hooks to provide quite a bit of standard functionality. For instance, we don’t want any hard coded strings in our HTML, otherwise we would force our translators to produce a different copy of the HTML for each language and then we would have to maintain all these files. Here we just use the helper function and it will look up the correct string from the language resource appropriate for the user’s language setting. This also gives us the ability to change the underlying control without changing all the HTMLs. So we can use a different date picker control for instance by changing the code our helper function emits rather than editing each HTML individually. Basically giving us a lot of global control over the behavior of the product.
These helper functions also can setup databinding. Any helper that start with ko will bind the data to the model (more precisely the viewmodel). We used ko since we use knockout.js for databinding which perhaps isn’t the best choice of function naming since again we can change the mechanism in the background without effecting the application code.
Notice there is a partial view called _Localization.cshtml that is included. This provides any localized strings that are needed by JavaScript. So anything referenced in here will be generated in the correct language when the page is loaded.
There is a strange call to “ConvertToJsVariableUsingNewtonSoft” near the top of the file. This is to load a copy of the model into JavaScript during page loading. This means we don’t need to do an initialization RPC call to get the model (Sage 300 View) meta data. Basically the usual empty screen then has the default data and meta data as a starting point.
Summary
This was a quick look at the Razor View part of our Web UIs. This is where the controls and layout are specified. Layout is handled by CSS and data binding is provided to greatly reduce required coding. Next we’ll start to look at the JavaScript that runs behind the scenes in the Browser.