
This month I want to talk about Data Import Manager (DIM). Specifically, about the setup for it. If you have installed the Sage 500 ERP client, registered the software, and activated the modules, there is more that needs to be done before you can use DIM to create new import jobs. This information is most likely going to help those who are setting up DIM for the first time and are running into issues when creating / saving an import job. Also, if you have already have import jobs running but you are creating a new connection type, and that new connection type job is having a problem saving, then this would also be a good place to start.
As it turns out, the cause of a lot (but not all) these issues saving new import jobs, is due to one or more setup steps that were not completed. The really good news is there is a (not so secret) document that has detailed checklists itemizing the steps of what needs to be installed and where. So where is this helpful pdf document? On the Sage 500 ERP client workstation, locate and open a document named Install.pdf ( Typically located under C:\Program Files (x86)\Sage Software\Sage MAS 500 Client\User Guides ). There is a section entitled Data Import Manager Installation & Configuration ( Fig 1 )

( FIG 1 )
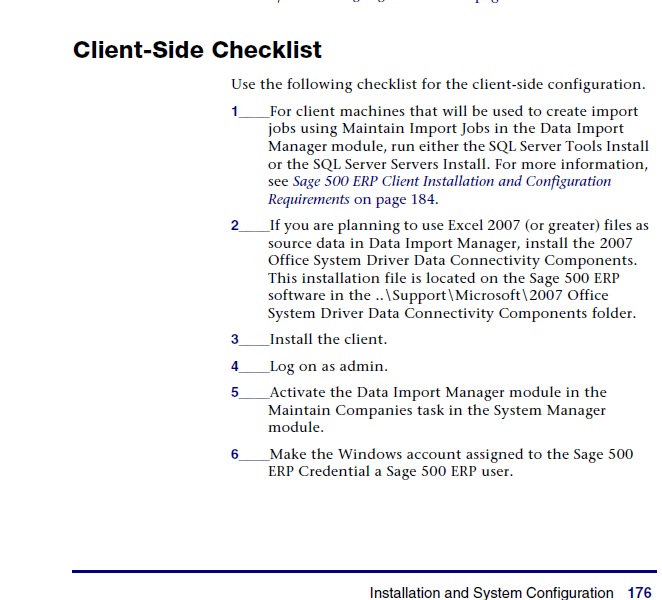
In this Appendix, there are a couple of checklists to which I would like to call your attention. Click on the link Installation and Configuration Checklists. Review the introduction paragraph there, and go to the next page where you will see the Server-Side Checklist and then on the page following, a Client-Side Checklist
The Client & Server Side( Fig 2 & 3 ) Checklist shows some items that need to be installed on the SQL Server machine where your Sage 500 database resides. It also lists some items that need to be installed on workstation, where Sage 500 ERP , is installed, that will be performing the import.
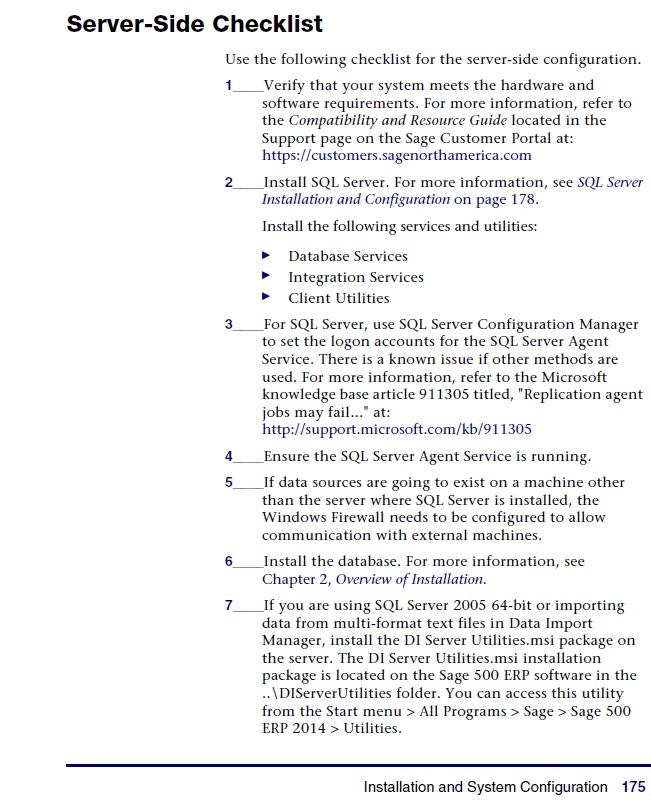
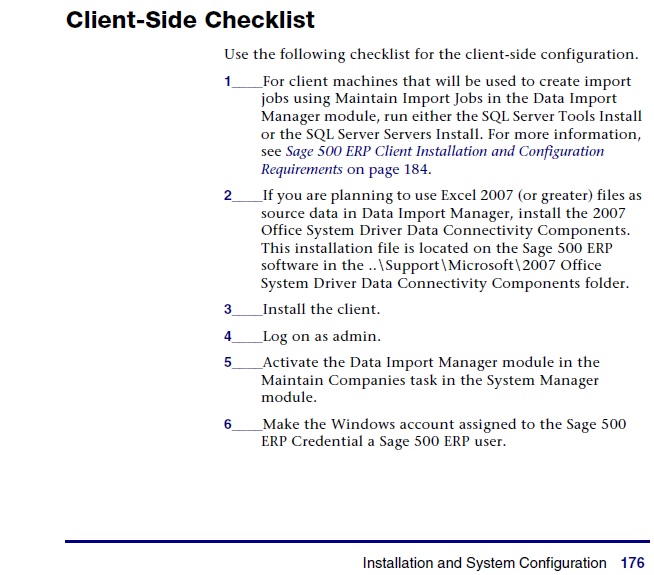
( FIG 2 & 3)
As you review each item from the checklist, some of them will have a sentence with a hyperlink to another part of the document that will explain what you need to do to accomplish said item. Other items may indicate to run an MSI install package. In some cases, you may need to download the referenced MSI install package from the Customer / Partner portal.
Go through each item, first client then server, and if it applies to the type of import you are doing, proceed with that step.
I hope this information helps you avoid any problems you might run into when trying to create import jobs for Data Import Manager. This is the start pointing that I use when troubleshooting new setup cases and has served me well. Oh, and don't keep this information a secret, tell everyone you know!
-Tony
P.S. By the way, my colleague Zenon wrote an excellent blog article about another aspect of Data Import Manager. Check it out here

