

Introduction
We’ve been talking about how to develop Web UIs using our beta SDK. But so far we’ve only been running these in Visual Studio, we haven’t talked about how to deploy them in a production system. With this article we’ll discuss how to add your menus to the home page. Which files need to be installed where and a few configuration notes to observe.
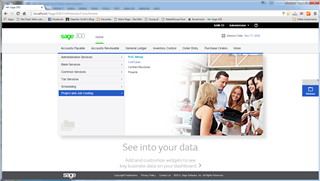
We’ll continue playing with Project and Job Costing, so first we’ll add PJC on to the end of the More menu in the Home Page:
As part of this we’ll build and deploy the PJC application so that we can run its UIs in a deployed environment, rather than just running the screens individually in Visual Studio like we have been.
The Code Generation Wizard
When you create your solution, you get a starting skeleton Sage.PM.BusinessRepository/Menu/PMMenuModuleHelper.cs. I’m using PM since I’m playing at creating PJC Web UIs, but instead of PM you will get whatever your application’s two letter prefix is. If you don’t have such a prefix, remember to register one with Sage to avoid conflicts with other Sage 300 SDK developers. Similarly, I use Sage as my company, but in reality this will be whatever company name you specified when you created the solution. This MenuModuleHelper.cs file specifies the name of the XML file that specifies your application’s Sage 300 Home Page menu structure. This C# source file is also where you put code to dynamically hide and show your program menu items, so for instance if you have some multi-currency only UIs then this is where you would put the code to hide them in the case of a single currency database (or application).
The solution wizard creates a starting PMMenuDetails.xml file in the root of the Sage.Web project. Then each time you run the code generation wizard it will add another item for the UI just generated. This will produce rather a flat structure so you need to polish this a bit as well as fix up the strings in the generated MenuResx.resx file in the Sage.PM.Resources project. This resource file contains all the strings that are displayed in the menu. Further you can optionally update all the generated files for the other supported languages.
One caveat on the MenuDetails.xml file is that you must give a security resource that the user has rights to or nothing will display. Leaving this out or putting N/A won’t work. One good comparison is that since these are XML files you can see all of Sage’s MenuDetails.xml files by looking in the Sage 300\Online\Web\App_Data\MenuDetail folder. Note that the way the customize screen works, it removes items and puts them in a company folder under these. It will regenerate them if the file changes, but if you have troubles you might try clearing these folders to force them to be regenerated.
Below is a sample XML element for a single UI to give a bit of flavor of what the MenuDetails.xml file contains.
<item>
<MenuID>PM4001</MenuID>
<MenuName>PM4001</MenuName>
<ResourceKey>PMCostType</ResourceKey>
<ParentMenuID>PM2000</ParentMenuID>
<IsGroupHeader>false</IsGroupHeader>
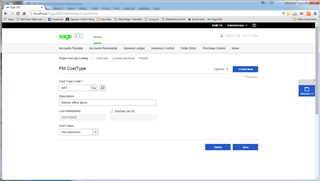
<ScreenURL>PM/CostType</ScreenURL>
<MenuItemLevel>4</MenuItemLevel>
<MenuItemOrder>2</MenuItemOrder>
<ColOrder>1</ColOrder>
<SecurityResourceKey>PMCostType</SecurityResourceKey>
<IsReport>false</IsReport>
<IsActive>true</IsActive>
<IsGroupEnd>false</IsGroupEnd>
<IsWidget>false</IsWidget>
<Isintelligence>false</Isintelligence>
<ModuleName>PM</ModuleName>
</item>
Post Build Utility
Now that we have our menu defined and our application screens running individually in debug mode inside Visual Studio, how do we deploy it to run inside IIS as a part of the Sage 300 system? Which DLLs need to be copied, which configuration files need to be copied and where do they all go? To try these steps, make sure you have the latest version of the Sage 300 SDK Wizards and the matching newest beta build.
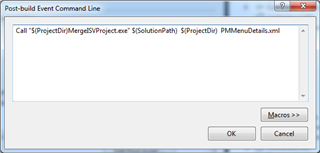
The Wizard adds a post build event to the Web project that will deploy all the right files to the local Sage 300 running in IIS. The MergeISVProject.exe utility can also be run standalone outside of VS, its a handy mechanism to copy your files. Its usually a good idea to restart IIS before testing this way to ensure all the new files are loaded.
This utility basically copies the following files to places under the Sage300\online\web folder:
- PMBootstrapper.xml is the configuration file which defines your application to Sage 300. Think of this as like roto.dat for the Web. It defines which are your DLLs to load using unity dependency injection when we start up.
- App_Data\MenuDetail\PMMenuDetails.xml is your menu definition that we talked about earlier.
- Areas\PM\*.* area all your Razor Views and their accompanying JavaScript. Basically anything that needs to go to the Browser.
- Bin\Sage.PM.*.dll and Bin\Sage.Web.DLL are the DLLs that you need to run. (Keep in mind that I’m using Sage for my company name, you will get whatever your company is instead of Sage in these).
With these in place your application is ready to roll.
Compiled Views
When we ship Sage 300, all our Razor Views are pre-compiled. This means the screens start much faster. If you don’t compile them, the when first accessed, IIS needs to invoke the C# compiler to compile them and we’ve found that this process can take ten seconds or so. Plus, the results are cached and the cache is reset every few days causing this to have to happen over again. Another plus is that when pre-compiled the Views can’t easily be edited, which means people can’t arbitrarily change these causing a problem for future upgrades.
Strangely Visual Studio doesn’t have a dialog where you can set whether you want your Views pre-compiled, you have to edit the Sage.Web.csproj file directly. And you need to change the XML value:
<MvcBuildViews>false</MvcBuildViews>
Between true and false yourself in a text editor.
The Sage 300 system is set so that it only runs compiled Razor Views. If you do want to run un-compiled Razor Views, then you need to edit Sage300\online\web\precompiledapp.config and change updatable from false to true.
Beta note: As I write this the MergeISVProject utility doesn’t copy compiled Views properly. This will be fixed shortly, but in the meantime if you want to test with compiled Views you need to copy these over by hand.
Beta note: The previous beta wouldn’t successfully compile if you were set to use compiled Views, this has been fixed and the solution wizard now includes all the references necessary to do this.
Summary
This article was meant to give a quick overview of the steps to take once you have a screen working in Visual Studio debug mode, to being able to test it running in the Sage 300 Home Page as part of a proper deployment. Generally, the tools help a lot and hopefully you don’t find this process too difficult.